Why are Holy Grail Timelapses so Difficult?
Hey everyone, Ryan here with my first true blog post in a while.
While I’ve focused on the development and launch of Arsenal for most of the last year or more, I want to introduce some additional content through the blog over time. I thought I’d start by writing about “holy grail” timelapses in anticipation of releasing that feature for Arsenal in the near future. In case you missed it, we provided some details on the timing of that release in another recent blog post.
A “holy grail” timelapse is one where your timelapse runs from day to night (or vice versa). The first time I heard the term I thought the name was a bit over the top. After a few years of trying though, I had only managed to get a few successful holy grail timelapses and they weren’t easy to get. Before I can talk about how Arsenal solves this problem, let me explain why it's such a challenging one (unless you’ve tried to take one, in which case you already know).
Keeping the exposure
Exposure is a complex thing. When doing holy grail, we need a way to keep the exposure correct as the light changes. This might seem simple, but exposure is more complex than you might expect. It’s not simply holding settings so the photo has the same histogram. Different scenes should produce different histograms, based on the content in the scene.
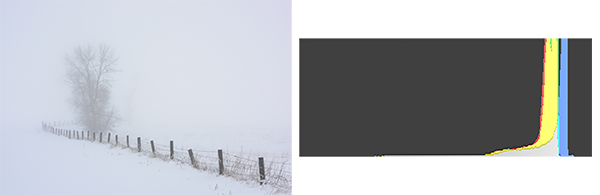
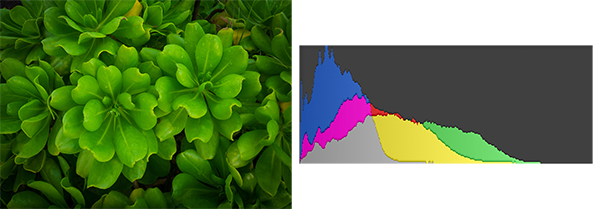
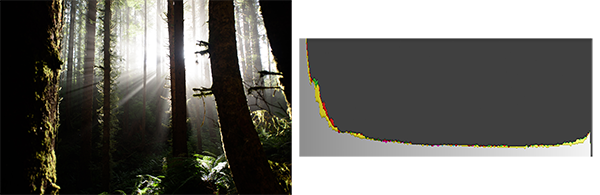
All of the above are what I would consider good exposure. The histogram needs to change based on a lot of factors, the details of which I could probably write a whole additional blog post about (and maybe someday I will!).
How to adjust exposure
Ideally we would like each shot in our timelapse to be correctly exposed and smoothly ramped between any setting changes. This leaves us with a few options:
1) Manually changing the settings
A good day-to-night timelapse is usually at least a few hours of shooting. The technique I see people having the most success with involves “babysitting” the camera and updating the settings manually every few minutes based on the last few shots. It’s a ton of work, but it can produce decent results (especially when smoothing is added in post). The challenge is ramping smoothly and judging the exposure correctly on the back of the camera screen. As it gets dark, your eyes have a harder time judging things and you need to rely more on the histogram. The other challenge is any setting adjustments need to happen during the interval, which can be tricky. All of the cameras I’ve ever used stop showing the review photos a few seconds before the next shot triggers, so this can leave you with only a few seconds to make a judgement and adjust settings. It also results in quite a bit of bumping the camera and opens up a host of issues if you miss shots or adjust settings suboptimally.
2) Shoot in aperture or shutter priority
The main issue is metering and lack of smooth ramping. Here’s a quick overview of how metering works:
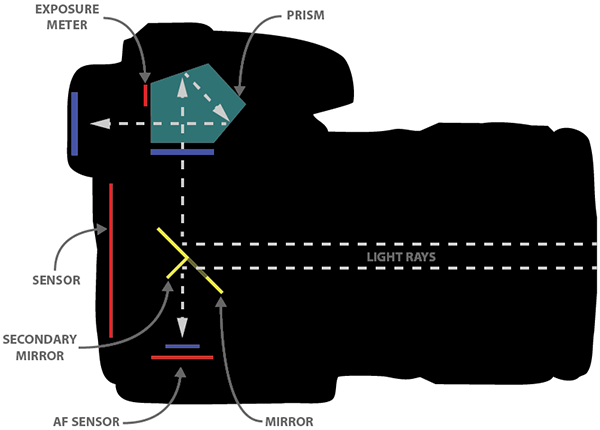
For DSLRs with the mirror up there’s some sensors that pick up some of the light in a small grid of sensors to detect brightness (the red “exposure meter” line in the diagram above). The Nikon D810 has 91,000 of these “metering pixels” for example.
For mirrorless cameras or in live view on DSLRs, they use the read-out from the sensor. This usually means a short sensor read-out (from what I could find, this is usually at 1/30th of a second on most cameras).
The problem is both of these metering techniques start to fail when things get dark. Cameras can only meter up to a point and once they aren’t metering anymore, your timelapse isn’t going to work. There’s a lot more I could say here, but I’ll keep it short (maybe another blog post).
Lastly, aperture/shutter priority still needs ISO adjustments to get you to night. You can use auto-ISO, but I have yet to find a camera that lets me control how auto-ISO and aperture priority interact in a way I think makes sense.
3) Luminosity Pegging
There’s a few third party tools out there for holy grail. Their approach involves taking a test photo and grabbing the average luminosity from that photo. This approach has a lot of issues, and I think it’s gotten popular because it's relatively easy to build a tool to peg luminosity.
Here’s the issues with luminosity pegging as I see it:
A) Night scenes should be darker
As mentioned above, correct exposure is pretty complicated. One thing our brain expects is photos to be darker for the same scene when there’s less light hitting the scene (aka at night). The difference isn’t huge in the final photo, but without it there are things that don’t look like they are at night. This can be handled by lowering the luminosity as it gets darker, but this usually doesn’t mirror actual changes in light. Often during good sunsets, it will get brighter before it gets darker. Other times it can get dark fast.
B) Dynamic Range
The range between the darkest elements in a photo and the brightest can change quite a bit during sunset/sunrises. During midday and midnight, it’s often possible to keep the darkest and brightest components within the dynamic range of the camera. As the sun goes down or comes up though, there can be times when you have to choose between losing details in the shadow and losing details in the highlights. This decision depends on specifically what the scene is, and varies based on subject.
C) Camera Response Function
Variances in the amount of light hitting the sensor does not linearly affect the brightness levels recorded in the final photo. As light increases, cameras “roll off” the highlights to make the area around blow highlights more pleasing. The result is large adjustments in luminosity can have minimal impact on some shots.
D) Changes in Scene
When something changes in the scene you’re shooting (clouds move out, moon goes away, etc), that should impact the exposure calculation. Pegging will hold the luminosity constant. I find the effect here is usually a photo that doesn’t reflect the “mood” of the real scene.
All of these approaches can work, but I’ve tried all of them and each tends to fail in one way or the other. I’ve had the most success with manually changing settings, but it takes more patience than I usually have and any errors or misses can be pretty impactful to something you’ve invested a lot of time in.
Using the current tools and techniques, it's pretty easy to end up with a timelapse that either requires a lot of work in post or is unusable. These tradeoffs are what set me in the direction of developing a holy grail timelapse solution. I wanted the control and ability to handle all different types of timelapses while also being able to reliably get higher quality results.
My apologies if this was all a bit too technical. I wanted to share my thoughts so users can really experience the benefits of the holy grail mode when launched, and to do so I had to lay some foundation work for how holy grails are done today. In my next blog post I’ll write about how Arsenal solves this problem. It will include some details of the distinct features within holy grail mode at launch, as well as some things we have planned for the future. In the meantime, I hope everyone is enjoying their Arsenal!
-Ryan