Arsenal 2 June Update
Hey everyone, Ryan here.
At Arsenal we’ve been working hard to prepare for launch and work around the global chip shortage issue we mentioned in our last update. Though not completely solved, we’ve made a ton of progress on that front and have lots to share on the overall project as well. So let’s jump into some updates.
Timeline
In our last update I wrote about some of the outstanding chips needed before we can ship. At the time there were 14 components we were missing. As of this writing we’re down to 3. So a lot of good progress on that front (thanks to Phillip, Nate, and our contract manufacturer). The last three parts have proven challenging - one of them is the CPU, which I mentioned last time as being a particular challenge given the demand for CPUs these days.
We’re working hard and looking at all of our options to solve these last three parts, but we have to do our due diligence when looking at new suppliers. We’re getting closer on those missing parts (we found a partial lot on one of them, but not enough to fully satisfy our order), and remain hopeful that we can meet our goal of shipping in August.
That said, we are getting closer to August and it takes time to manufacture and distribute products to the various fulfillment centers we use around the globe. A positive though is that freight logistics have started to clear up from COVID-19 and the Suez canal blockage. It’s not quite back to pre-pandemic levels, but it’s a clear improvement. Continued return to normalcy there will help us with the timeline..
So our plan is to be heads down on working to solve the remaining missing chips for the next three weeks. If we can, we’ll be looking good for August. Either way, look for an update that first week of July.
Also, I wanted to take a quick minute and say thanks for the amazing support from the Arsenal community. It’s never fun to deliver bad news, as we did with the delay in our last update, but your support was just incredible. The amount of positivity and understanding given the state of global events was really great to see. And a number of you used the opportunity to think more about the product and dive in further with some great questions. I love to see those, and am happy to answer them. Thanks again for your incredible support!
Hardware Updates
The feedback on our hardware deep dives has been positive, so I wanted to give Phillip (our engineer) some time to chat about a unique solution we came up with for Arsenal 2.
From Phillip:
I wanted to go into a little more detail on the printed circuit board (PCB) assembly process, specifically around the antenna design we discussed in the last update because it’s just really cool and unique!
The assembly step we’ll be discussing in more detail today is the application of solder paste to the PCB. But before we do, let’s clarify what solder paste and a solder paste stencil are actually. Solder paste is composed of microscopic balls of solder suspended in a supporting agent called flux. A solder paste stencil is typically a flat (remember this for later) piece of steel around 0.1mm thick with small apertures in it that match up with each pad on the PCB.
During the application process, a special machine called a screen printer accurately positions the stencil on top of the PCB. Once properly positioned, the screen printer runs a squeegee blade across the top of the stencil. In front of the squeegee blade is the solder paste, and as the squeegee blade moves across the stencil, it forces the solder paste into the stencil’s apertures and onto the PCB’s surface (imagine spreading butter across a piece of toast with a knife). After the squeegee blade is completely across the stencil, the screen printer lifts the stencil off the PCB, leaving behind solder paste on each pad but nowhere else. The PCB is now ready to have components loaded.
As I mentioned, solder paste stencils are typically flat, but if you’ll remember from the last update, our antenna will be protruding past the top side of the PCB during this assembly step. Here is a cross section of the PCB prior to placing components on the top side of the board to jog your memory:
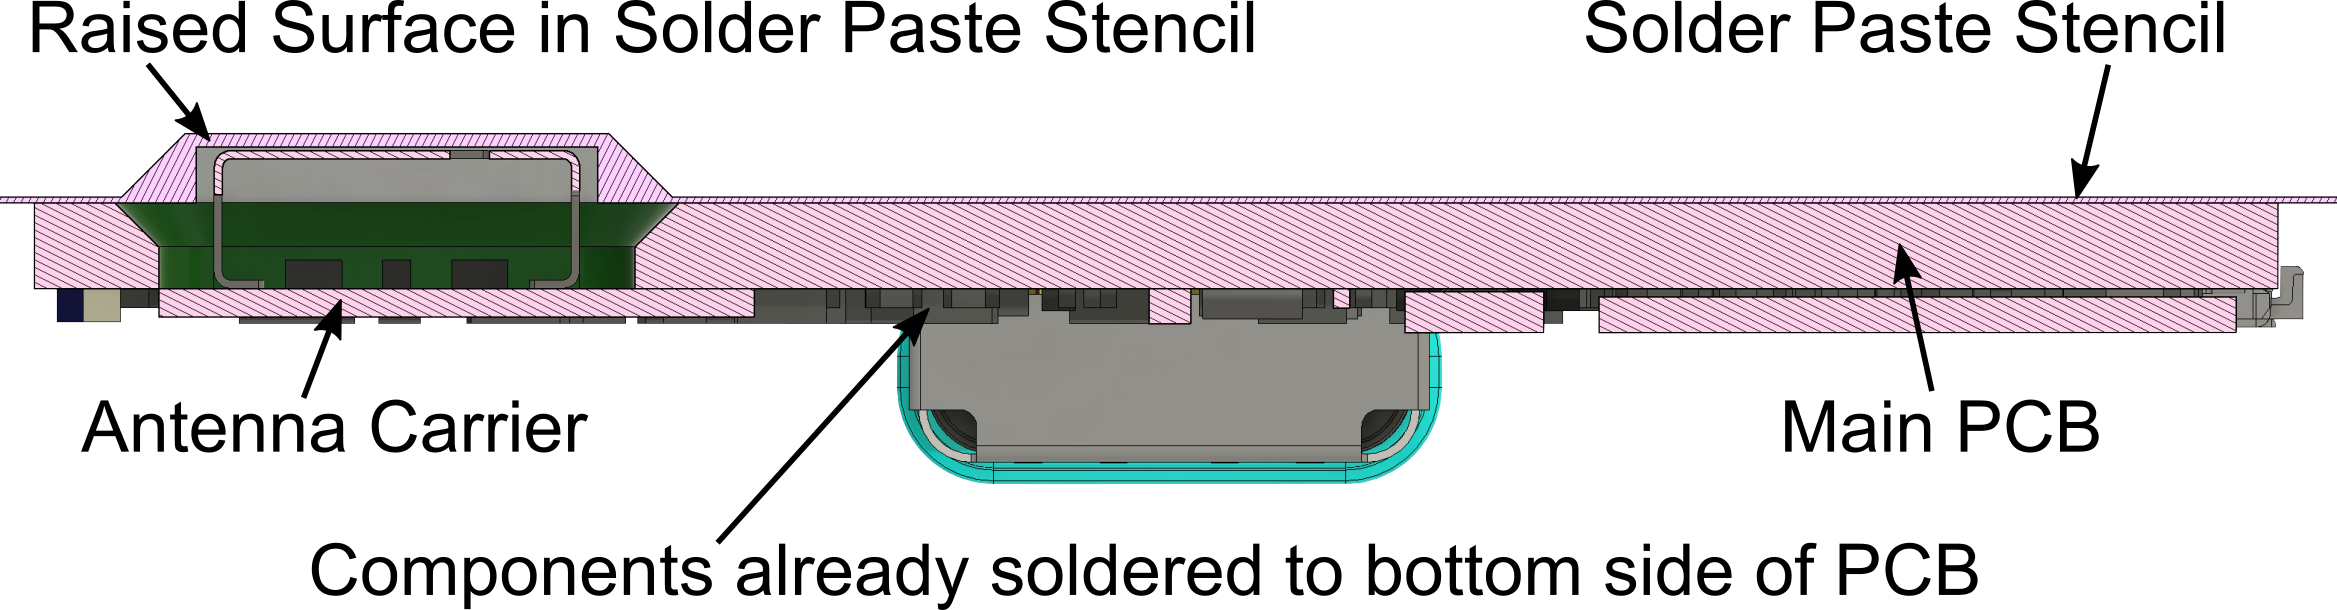
You’ve probably already noticed the problem; you can’t expect a flat solder paste stencil to conform with a PCB that has a part protruding past its surface (if the solder paste stencil is not perfectly flat against the PCB’s surface, the squeegee blade will force extra solder paste in between the stencil and the PCB, increasing the probability of defects). Luckily there is a solution to this problem; create a solder paste stencil with a raised surface around the part protruding past the top surface of the PCB (the antenna in our case). As simple as that sounds, there is actually a lot of manufacturing engineering that has been done to solve this problem. The solution is three part:
Use a combination of milling, laser cutting, and plasma coating to produce a special “3D” solder paste stencil that creates a raised surface (about 1mm in our case) around the required regions.
Create a custom squeegee blade that contains microslits (cuts 0.05mm in width) that allow the squeegee blade to adapt and conform to the surface of the solder paste stencil as it slides across it.
Fine tune the screen printer parameters (speed, pressure, solder paste, etc.) for the specific design to ensure a consistent and acceptable output.
What you get is a squeegee with “fingers” that can move independently as it moves across the surface of the solder paste stencil. When one of the fingers hits a raised surface in the solder paste stencil, it independently flexes backwards, but adjacent fingers are unaffected and continue to apply solder paste as designed around the raised surface. When the raised surface ends, the finger that was flexed backwards moves back to its original position and continues to apply solder paste as designed past the raised surface. Check out this example video:
This manufacturing concept was originally intended for applying solder paste (and components) into PCB cavities, but we’ve adapted it in a way I haven’t seen done in my entire career!
Software Updates
Star Focus
We've had a lot of clear nights in Montana lately, so I've been out testing/improving our star focus algorithm. Each camera system has a different way you control focus, so I've been testing with a lot of different cameras/lenses and making adjustments where it's needed. Aside from the occasional cloud drifting into frame, it's hitting focus every time. Most of my work at this point is on speeding things up.
Below is a quick demo of the Night Assist mode. Once it gets exposure, you can tap to “refresh” the preview. It takes a fast shutter shot (usually <2 seconds depending on the camera’s noise floor) so you can compose. Then you can tap in the sky to star focus.
The star focusing algorithm is pretty similar to how you would automatically focus a telescope. It again takes a bunch of fast shutter shots moving the focus motor. Normal (daytime) auto focus algorithms tend to move back and forth looking for the sharpest position. With night focus, we instead search over an area and then minimize a v-curve. This allows us to find the best focus in fewer test shots. Also with stars, the area right around the best focus might not have a lot of gradient (basically minor adjustments in focus might not produce a lot of change in the measurements), so v-curve minimization does a better job.
The above is the most challenging test I have, using my Sigma 20mm 1.4. This lens (at least my copy) has a lot of coma and never really gets that sharp at 1.4 (again, my copy at least), also there’s some haze and a lot of light pollution. You can see the night focus does a really good job though. When I zoom in a ton you can see some slight star trailing from the 25” exposure, but everything is sharp, and you could shorten the shutter to get less trailing (at the cost of some noise though). Also, sorry for the boring demo, I drove up to a nice mountain lake to shoot a demo and got clouded out.
Total focus time depends on a lot of factors, but it’s always under 2 minutes, and most of the time now we’ve got it under 1 minute.
Crowd Control
Ben has been working hard to add real-time preview to our Crowd Control stacker. You can choose the interval, then as crowd control shoots, it updates the preview as you go. The final full resolution render usually does a bit better job of removing moving objects than you’ll see in the preview. So if an object is removed in the preview, it will definitely be gone in the final render. Being able to see when you've got a clean shot and then hit stop makes for a great experience and I've been having a lot of fun testing the new UI out around the office.
Ben has also been making some changes to the settings menu to better integrate microSD card formatting and the options around what saves where that we showed in the last update.
Testing/Polish
We’ve hit the stage where a lot of the software work is testing, debugging, and what we call “polish” (little experience improvements). While the parts delay isn’t something we’re happy about, I think the dev team is glad to have more time to improve things. We’ve been adding some tools to help us catalog and fix bugs we run into during the beta program. There’s also a lot of work right now improving our camera tests.
Nikon Z6ii/Z7ii
We haven’t had a ton of time to work on new camera support yet, but we did manage to finally get the Nikon Z6ii and Z7ii in and have been able to add them to Arsenal 2! When we send out the pledge manager shortly before shipping you can pick these cameras (or any other supported camera) so you get the right USB cable.
Call for BETAs
With Arsenal 1 we developed a pretty large team of BETAs that did a great job in helping us test before we launched new updates. Much of that team has come over to Arsenal 2, but we’d love to continue to expand it. So if you’re interested in testing out Arsenal 2 updates and providing feedback send an email to beta@witharsenal.com - be sure to include your camera model and what phone you have. In particular, if you have a Nikon Z6/Z7, a supported Fuji camera, or a Canon EOS R series that’d be a great help to BETA, though we’re happy to have backers with any supported camera.
Tutorials
As I mentioned last time, Lucian (our videographer) has been hard at work on a tutorial series we’re hoping to have ready by launch. The goal is to provide an entertaining series that is a mix of Arsenal 2 tutorial, photography tips/tricks, and travel vlog (with chapter markers if you’re only interested in the tutorial stuff). There’s still a lot to be shot/edited, but here’s a couple of little teasers from the timelapse tutorial video.
Wrap Up
Thanks again for all of your incredible support. More to come soon!
- Ryan